How to draw arrows on screenshots (that look hand-drawn)
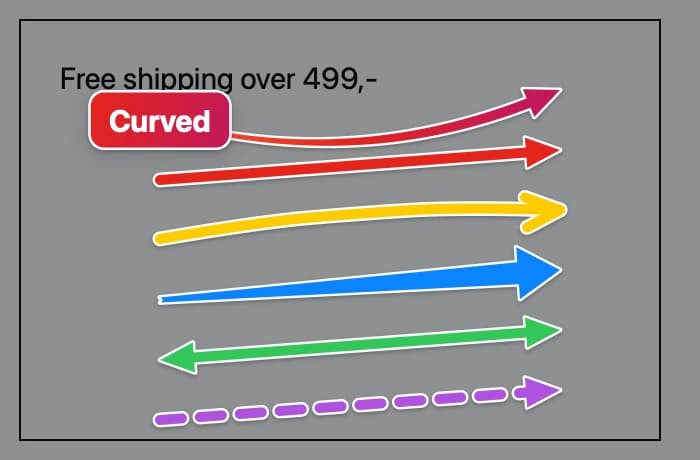
On a Mac you can draw a basic straight arrow on a screenshot with Preview’s Markup (Shapes → Line, then an arrowhead style). For arrows that look drawn by hand, tapered and curved the way you moved, use Zinxo: capture with ⌘⇧4, press A and drag; there are six styles (curved, straight, hand-drawn, marker, double, dashed) and the tip can snap to the element you point at.
In Preview (free)
- Open the screenshot in Preview.
- View → Show Markup Toolbar.
- Shapes → Line; then use Shape Style to add an arrowhead.
- Drag the line into place and adjust the colour and thickness.
With Zinxo
- Press ⌘⇧4, drag over the area, then click the floating thumbnail to open the editor.
- Press A (Arrow) and drag from empty space towards the target. If your drag bends, the arrow bends the same way.
- Pick the style in the options strip: curved, straight, hand-drawn, marker, double or dashed. Taper makes the tail thinner than the head.
- The tip snaps to the edge of the button or row under it. Press F to turn snapping off, or hold ⌘ while dragging.
- Use ⌘[ and ⌘] for thinner or thicker, add a label if you want, then ⌘↩ to finish and copy.
What makes an arrow read well
Start the arrow in empty space, not on top of other text. Curve it slightly so it doesn’t look like a UI element. Keep one colour for every arrow in a screenshot, and let a white halo separate it from busy backgrounds; Zinxo draws that halo and a soft shadow by default.
Zinxo: $29 once (regular $39), 1 Mac, 1 year of updatesCapture, hand-drawn markup, 3D mockups, scrolling capture, recording to MP4 or GIF, OCR search and agent handoff in one native Mac app. One price, no subscription.